I recently installed gutters on our front and back eaves. I’m not a huge fan of gutters in general, but there was just too much of a waterfall by the doors. So I decided to try to get some use out of them, and catch the water in a rain barrel. I’m liking how it came out, so I figured I’d share my steps here.
The Barrel
The first thing I did was pick out a barrel. I chose this one: “RTS Home Accents 50 Gallon Eco Rain Barrel.” It was fairly cheap ($69 at the time of purchase), and had fairly good reviews. Some people complained about how they couldn’t get the plastic spigots to attach correctly, but I figured I could sort that out. The main reason I got it was because of its flat back, so it could lay flush on my house’s masonry. That turned out to be a good choice.

Oh, I also bought the optional stand to rest the barrel on. To me, that was a waste of money. It felt a bit unstable, but the main reason was that in person, it was horrendously ugly. I wanted this project to yield something I was proud of — that I thought added value to my home — and I would never have been satisfied with the finish project if it was resting on that stand.

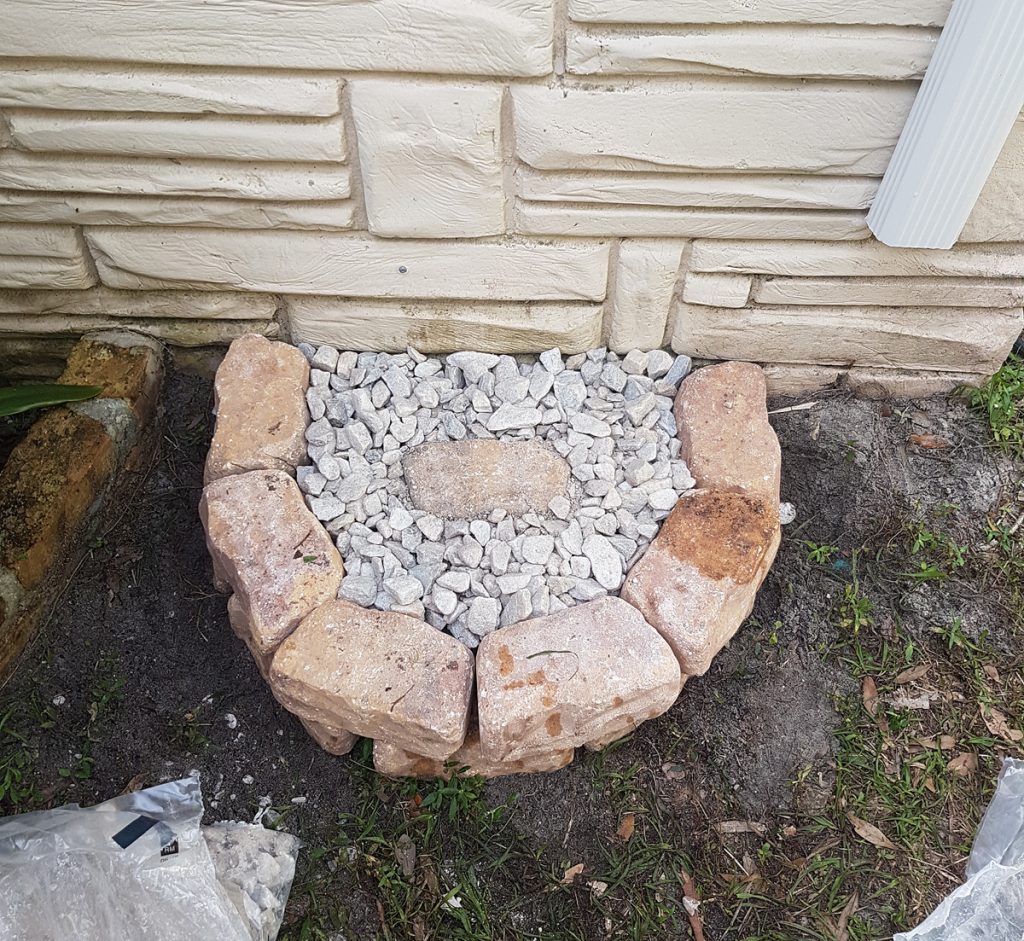
The Base
So after my disappointment with the manufacturer’s stand, I went back to the store to brainstorm how to make my own. I planned to use this rain barrel for drip irrigation, so it doesn’t need to be raised as high as if I wanted to use it with a hose. I decided, in keeping with some other features around my garden, something using bricks might be nice. These are what I decided on: “Harvest Blend Concrete Retaining Wall” (at least I think so — hard to tell from the website). I wasn’t sure how well I’d like them, but Home Depot’s return policy is so easy that I don’t think twice about buying something to experiment with.

First, I tamped the ground down so it was nice and firm. Then, I arranged them in a semi-circle, digging a little wherever necessary to ensure the bricks were level. I then placed the barrel on top, to see if I liked the look. After I decided I liked it enough to test it for a while, I filled in the center with a couple bricks, and some gravel rocks. This should give it enough support as well as drainage. The rain barrel will be heavy when full, so the center needs to be supported too — not just the edges!

Putting it all together
Next I put the barrel on top, and made sure it was stable and level. Adding a bit of water to give it some weight can help with this. Mine was stable but a tad unlevel, which was super obvious because of the lines in my masonry. So I took the barrel off and dug some of the bricks a little deeper, until I was satisfied.

After the barrel was sitting nicely, I strapped it to the wall using some hanger strap. I did this because some of the reviews said that the barrel can sometimes bow outwards when its full, and that this can push it away from the wall. Obviously that would look silly — I want mine to stay flush. With these straps it seems well fixed in place, and has not bowed outwards yet. All that was left to do was re-route the gutter to the barrel, and it’s all done!

The Irrigation
Ok, not it’s not all done. We’d be done if we just wanted to use the barrel with a hose or to fill a watering can, but I wanted to use it for drip irrigation. So I attached a Y-adapter with valves to the spigot. One of the outlets will be in case I ever need to fill a can or use a hose, and the other will be dedicated to drip irrigation. In case it’s unclear what I mean, check out this picture:

At first I used small drip irrigation tubing (like this) for the entire run from the barrel to the plants. But it was just too much pressure drop for gravity alone. As a result, the water flowed really slowly, and was not distributed evenly amongst the plants.
So instead, I upgraded to bigger 1/2” swing pipe (like this) for the main run, then used the small tubing for breaking away to each plant I wanted to water. You can see what I mean on the two images below. The main tube has five offshoots, and each offshoot splits into two small tubes — so the barrel waters ten individual plants in total.


Ok, now that really is it! I have to say, I’m very happy with how this works so far. The barrel fills up on rainy day, and the water sits there until I need it. Then I just turn the valve on the Y-adapter, and a nice little section of my garden gets watered! I was waiting until I knew whether I liked it before I buried the tube and painted the barrel. But it’s safe to say that I do like it, so next up I have to decide what color to paint the barrel… a wood color, or to match my masonry?